The first problem is how water gets into the boat. There are really three main ways this happens:
- The Stuffing Box - our traditional stuffing box should drip once every 8 seconds when in use. In reality it is quite old and drips probably every second leading to a increased flow of water. While I plan on switching to a drippless stuffing box this is how it is currently rigged.
- The Ice Box - some genius thought they would drain the ice box into one of the lockers under the port settee. I guess one could plug it and put a bowl under neath it. Instead a previous owner thought they would drain it into a "pre"bilge under the engine (where the stuffing box water collects). This water is always ice melt with a bit of food debris.
- Crew Error - basically if someone leaves a hatch open and rain or spray get down below or when a head gets left in the open position in heavy weather and wills the boat up with 100 litres of see water.
The solutions that had been put into place to manage these had been as follows:
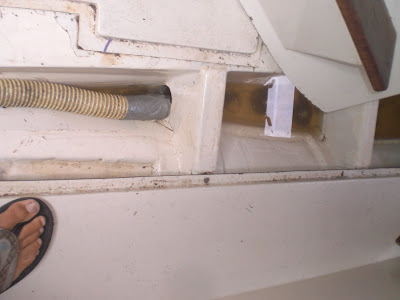
The nasty bilge with the old manual hose. The hose would not suck the bilge water out unless it was overflowing.
- A Manual Bilge Pump - the traditional type worked from the cockpit with a 1.5 inch hose glassed into the sole of the boat running into the main bilge. This is fine if there is a lot of water but does not work at all if the bilge is not overflowing.
One of the weirder designs I have scene with the old eclectic pump dumping water into the cockpit.
- A Automatic 500GPH Bilge Pump - this device is located underneath the engine in the "pre"bilge. Now this in itself is a good idea except someone had obviously not wanted to cut a hole in the hull and instead ran the hose into the cockpit through the lazerrette. So you get the cockpit floor soaking wet when you run it. If you leave it in automatic you get surprised every thirty minutes or so when water jets out into the cockpit. Not smart.
Another problem with the design of the boat is that this bilge water is designed to flow down and collect in the bilges. Of course what comes down can also come back up again when you lay a sailboat on its side in heavy weather. This water can collect in settee lockers or soak various vital components and generally makes a mess.
So now it comes to solution time. Firstly my long term solution is to replace my traditional stuffing box with a PSS dripless stuffing box. This will eliminate the main source of water in my boat. The next part of the solution is how to get water out of the boat once it gets in. I wanted to redesign it and have it arranged to be as professional and problem free as possible.
A overview of my new bilge pump plan.
I went with a 3 bilge pump configuration. I would have one high capacity manual bilge pumps and two automatic electric bilge pumps. The manual pump would be intended to be used in more emergency situations where as the electric pumps would be used to take care of any routine water. I wanted the electric pumps to be rigged up to work in automatic and manual modes. I also wanted to have them empty out to sea instead of into the boat. With this in mind I set about getting the appropriate components and tools.
The items I acquired were simple and easy to install with simple tools
- Ratchet screwdriver (a normal flat head would work too)
- Knife (for cutting hose a hacksaw works too)
- Wire strippers/cutters/crimpers
- Heat Gun
- Drill
- 1-1/4" Hole Saw
The items I purchased to do the job were also simple and straight forward:
- 2x Rule 500 GPH Automatic Bilge Pumps
- Rule Automatic-Off-Manual Bilge Pump switch and Plate
- 3 strand 16 gauge marine wire
- Hose Clamps 3/4"
- T-Valve with 3/4" barbs
- Nylon thru-hull with 3/4" barb
- 16 Gauge wire but connectors with heat shrink seals
- 3M 4200 Marine Sealant
- 2.5 Amp In Line Fuse
- 2x None-Return Valves
With all of the items in hand I set about the work. The first problem I found was running a new bilge hose into the main bilge. It was glassed in such away that it was impossible to run another hose. I had a tough decision to make. I could not go ahead with the project or cut the manual hose and use it as a conduit. I cut the manual hose off in the "pre" bilge under the engine. It could still be used if there was at least +3" of water in the boat. I could now use the old hose section as a conduit to run the wiring and the new hose.
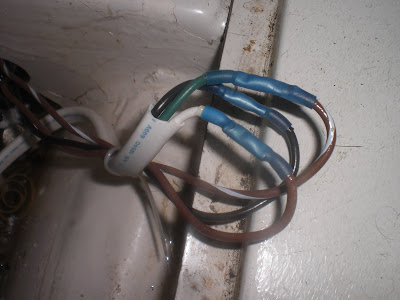
Wiring with heat shrink butt connectors are dead easy to use and look good too.
The non-return valve was essential to this setup.
The pump rest was easy to do there were three wires to connect a negative, manual positive, and automatic positive. I used but connectors that already had the heat shrink sleeves so I fired up the heat gun and sealed them. Now one of the things I had to go back and do but should have been done at this point was adding a non-return valve in the bilge hose as close to the engine as I could. This stops water from flooding back in after the pump shuts off. It was easy to install and well worth it.
Using the old hose line as a conduit I ran the new bilge hose and wiring out of the bilge.
The second bilge pump in the "pre"bilge under the engine.
I ran the hose and wiring to the second bilge pump. I ran into another issue here when I tried to use the old bilge pump that was a older model with a two wire configuration. It was not compatible unless I wanted the other pump to run constantly so I went with a new identical pump. Here I used a T-valve with barbed ends to connect the bilge hoses. I also made sure to add a non-return valve to the 2nd pump. As with all of the hose fittings I added hose clamps to all the connections for added protection. The wiring was connected into the line so both pumps would be controlled off a single switch. I did not want the pumps requiring separate hoses and switches because of the cost and the holes required.
The new bilge pump switch with three settings.
Next I cut out a hole for the new switch and connected up the corresponding wires making sure to have a 2.5 amp fuse between the bus and the switch. I selected a 3 position bilge switch that allowed for the pumps to be set in automatic or manual mode. It was dead simple to install.
The final chapter was perhaps the hardest for me. I hate cutting holes in the boat; especially the hull. I chose the location carefully. I could not do it on the transom so I decided to mount it on the aft port side just below the hull deck joint. My intent was to have it as high up from the water as possible. It is very unlikely that this thru-hull will be fully immersed; for that reason I went with a nylon fitting and added sealed it with 3m 4200.
All in all it was a fairly simple job and if it wasn't for a few screw ups would have taken less than 4 hours to complete. I now have a very good bilge pump arrangement that looks slick and is easy to use. I found the West Marine advisor video to be very helpful.
West Marine Video click here


No comments:
Post a Comment